This project was submitted by one of our readers, just like you.
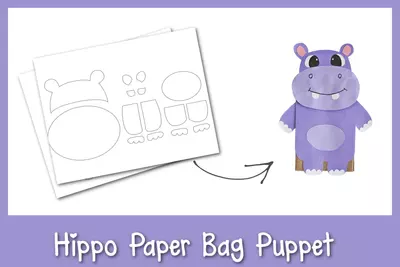
Hippo Paper Bag Puppet

Hippo Paper Bag Puppet
"Add a hippo to your puppet zoo with our Hippo Paper Bag Puppet! Your kids will love crafting their hippos, and then love playing with them when they’re done. You’re going to love all the fine motor practice and time spent together as a family. All you need is some construction paper, glue, scissors, and a paper lunch sack, and you’re ready to go! Our house is looking more and more like a zoo every day! We recently finished up our Sloth Paper Bag Puppet, Zebra Paper Bag Puppet, and Koala Paper Bag Puppets, and we had so much fun! I knew we needed to add another animal to our collection, and we decided on a hippo. Who doesn’t love a hippo? Our family loved gathering around the table and transforming a simple paper lunch bag into a puppet the kids could all play with together. We ended up with an entire hippo family to add to our puppet zoo! The kids loved imagining make believe stories of hippos stuck in New York City or hippos accidentally ending up at Disneyland. I loved listening to them playing together without bickering or fighting! A win-win! When your kids are finished playing with your zoo of animal puppets, you might be able to convince them to start a fairytale collection, including Little Red Riding Hood, Cinderella, and Mirabel. "
Primary TechniquePaper Crafts

Materials List
-
Construction papers
-
Construction papers
Pencil – to trace the template
- Craft glue
-
Sharpie or gel pen
- Paper bag
Instructions
-
Grab colored construction papers for the hippopotamus figure. The template includes the top part of the head, inner ears, upper legs, lower legs, nails, teeth, belly (oval shape), and lower part of head. Trace the template patterns on the selected craft papers and cut out the traced pattern.
-
Glue the nail cutouts on the leg cutouts.
-
Glue the inner ear cutouts on the ear parts of the top part of the head.
-
Glue the 2 head pieces together.
-
Use a sharpie or pen to draw the mouth-line and the nose of the hippo puppet.
-
Glue the eyes on the top part and glue the teeth along the bottom side of the mouth-line.
-
Measure and cut out a piece of paper to cover one side of the paper bag. This will be the front side of the paper bag puppet.
-
Glue the 2 short leg patterns on the bottom side of the paper.
-
Glue the paper on the paper bag, keeping the legs facing the open end of the bag. This will be the bottom side of the puppet.
-
Glue the oval cutout (belly) on the front side (near the bottom part) of the paper bag puppet.
-
Flatten the bottom side of the bag with the front side and glue the head pattern on the bottom side.
-
Glue the 2 long leg cutouts on both sides (left and right) of the hippo paper bag puppet to complete the craft.

Read NextRustic Wine Bottle Home Decor