This project was submitted by one of our readers, just like you.
Toilet Paper Roll R2-d2 Craft

Toilet Paper Roll R2-d2 Craft
"Upcycle some old toilet paper rolls and provide the kids with endless fun with this adorable Star Wars Toilet Paper Roll R2D2 craft! It is simple and made from materials you most likely already have around the house! Your kids will love making one of their favorite Star Wars characters, and you will love your kids' hands being busy and spending time together as a family this Valentine's Day season. Have your kids make a few and give them to friends as a Valentine's Day gift! "
Primary TechniquePaper Crafts

Materials List
- Construction paper
- Empty TP roll
- Sharpie
- Craft glue
- Pencil
- Scissors
Instructions
-
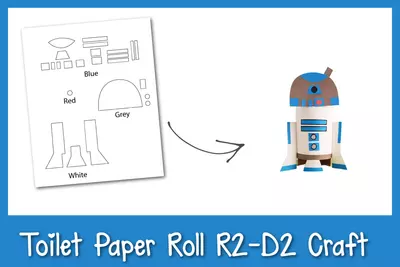
Start by choosing white, gray, red, and blue sheets of construction paper. Trace the patterns on the selected craft papers as noted on the template. Now that everything is traced out, you can cut out the traced patterns using scissors. Measure and cut out a white paper big enough to cover the TP roll. Also, cut a gray strip just shorter than the length of the white paper for the border.
-
Grab your glue stick and attach the gray strip cutout along either long side of the white paper prepared to cover the roll. Next, glue the small square and rectangle cutouts along the bottom side of the gray half round shape cutout (this is the head). Next, glue the blue strips on the leg cutouts.
-
Stick the 2 blue strips and square cutouts horizontally in the middle of the large white paper. Attach the small gray round cutouts in the middle of the blue squares.
-
Use a black sharpie to trace the outline of the squares, strips, and round shapes. Draw a black-filled circle in the middle of the blue trapezium shape on the head. Glue the red round cutout in the middle of the middle square attached along the bottom end of the head. Glue the gray square cutout on the right top end of the head.
-
Grab the empty TP roll and trace the middle stand pattern on the bottom side of it. Cut out the shape so the leg pattern has some support from the TP roll and the area on either side of the leg stand is cutout. Keep the backsides intact so that the TP roll R2D2 can stand straight.
-
Grab your glue again and attach the middle leg stand on the traced section of the TP roll from the previous step.
-
Cover the TP roll with the white paper, making sure to keep the blue parts right above the middle stand. Glue closed in the back.
-
Attach the side stands on both sides of the roll so that they stick out. Then glue the head pattern on the top side of the roll. Just like that your R2D2 Papercraft is complete!

Read NextFall Porch Idea