This project was submitted by one of our readers, just like you.
DIY Jewellery stand
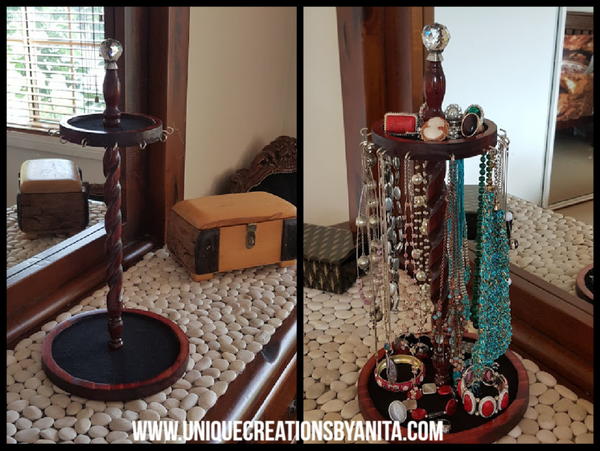
"I work as an aged care nurse and one of our residents has so much jewellery that is all tangled up in a box. Every morning I would spend a long time trying to untangle a necklace for her to wear. To solve this problem I made her a stand to display all her jewellery. I added lots of hooks for her necklaces and space for her rings and broaches. This stand not only looks great on her table, but she can also now see at a glance what she can wear. I made this stand using all recycled materials."
Primary TechniqueWood Crafts

Materials List
- Scrap wood
- jigsaw
- router
- sander
- hooks
- fabric
- wood glue
- doorknob
- Chair spindle
Instructions
-
Cut 2 circles of wood, the bottom bigger than the top.
-
Using a router remove the middle section of both wood circles to make a lip. This will stop the jewellery from falling off.
-
I used a chair spindle for the poles. You can use a doweling rod if you don't have suitable wood.
-
To smooth out the bottom and the sides I used my orbital sander. For the smaller one, I used a sanding wheel because my sander would not fit into the hole.
-
I used some cardboard to cut a template for the felt that would line the bottom. I stained and varnished the pieces.
-
I found the centre of my circles and drilled a hole slightly smaller than the nut that fits on the bottom of the pole. I mixed up some epoxy resin and filled the hole then very gently tapped the nut into the hole with a hammer.
-
I used my cardboard template to cut my felt and glued it down to the base. The bottom of the pole screwed into the nut. For the top, I drilled a hole in the centre for the screw to come through and cut away some of the felt so I could glue the top down. The top pole was just a piece that I cut off the pole.
-
I found the right sized screw and cut off its head. I drilled a pilot hole in the top of the post for the screw and used it to attach the pole to the glass doorknob. I added some curtain hooks to the top and my stand was complete.
Read NextRecycle Jar Craft Kits


