DIY Bar Cart
This clever Ikea hack will impress your guests and making hosting a breeze.

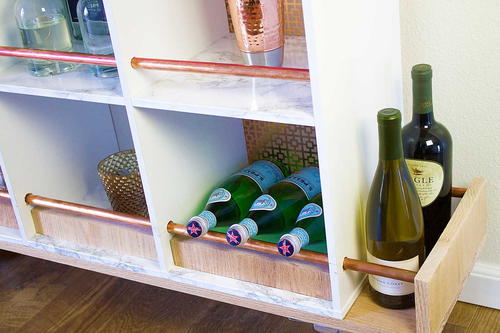
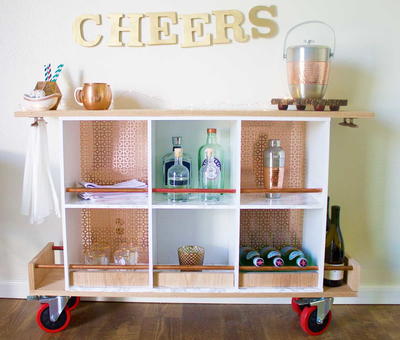
Upcycling old furniture into new items provides a cost-efficient way to remodel your living space. This DIY bar cart transforms an old storage cabinet into a rolling bar perfect for entertaining. Most of the materials for this project can be found around your home or re-purposed from other projects. Turning your old organizer into an entertaining accessory will only take an evening, but the resulting mobile bar will change the way you entertain forever. Make this project this weekend so you'll be ready for the next dinner party that you host.
Estimated Cost$21-$30
Time to CompleteIn an evening
Primary TechniqueRepurposing

Project TypeMake a Project
Materials List
- 6-cubby storage unit
- 9′ red oak board
- 12′ copper piping
- Patterned copper-colored
- Aluminum sheets
- Sailing cleats
- Copper spray paint
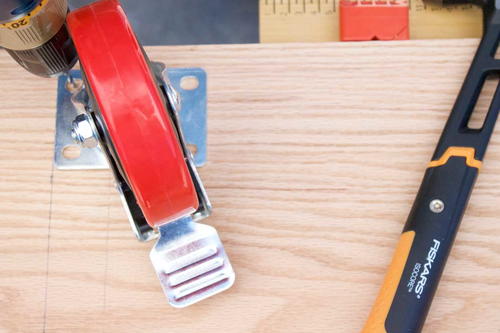
- 4 casters
- Nails
- Screws
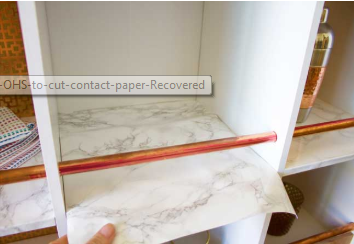
- Marbled contact paper
- Adhesive
- Wood saw and hacksaw
- The Original Orange-handled Scissors™ (8")
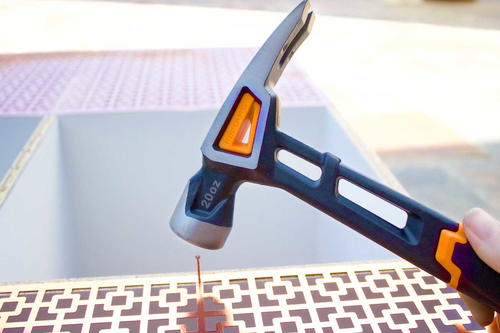
- IsoCore™ 20 oz General Use Hammer (15.5")
Instructions:
-
A 6-cubby storage unit makes the perfect base for this rolling bar cart. Start by assembling the storage unit (if new), using the IsoCore™ General Use Hammer. Alternatively, remove the back panel if you are upcycling an existing unit. The hammer's rip claw will pull nails quickly and easily if you are removing the back panels from an old unit.
-
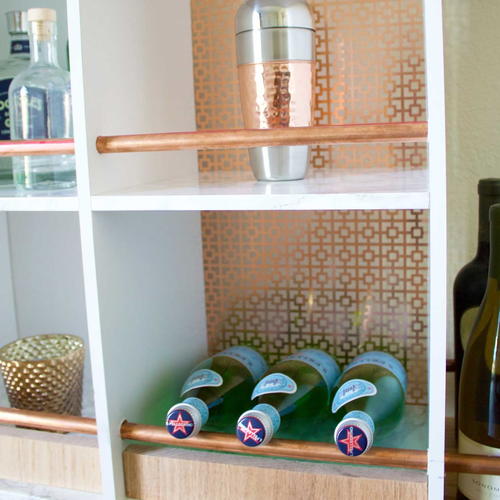
Give the simple storage unit an upscale finish with an attractive, copper back panel. Align the patterned copper sheets at the back of the unit and hammer in place using nails.
-
To prevent your glasses and bottles from falling from your rolling bar cart, add rails along the front of the cubbies. Drill holes through the front of the unit using a drill bit that is slightly wider in diameter than your copper pipe. Pass the pipe through the holes and cut to size with a hacksaw or a saw that is suitable for cutting metal.
-
Measure the width of the assembled unit and cut two red oak boards the same width but slightly longer than the storage unit. Adding extra length to the boards will give you a useful space to store wine or other taller bottles at the bottom of the cart. The top board should be the same length as the bottom board, so it will hang over the cubby on each end. Screw these boards to the top and bottom of the unit.
-
Measure and mark where the casters will sit on the bottom of the red oak board base, and attach to all four corners using screws.
-
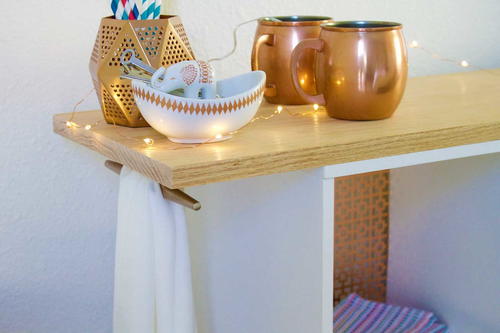
Spray two sailing cleats with a metallic copper paint and screw to the underside of each end of the top piece of wood. They will act as handles and also somewhere to hang your tea towel.
-
Spray two sailing cleats with a metallic copper paint and screw to the underside of each end of the top piece of wood. They will act as handles and also somewhere to hang your tea towel.
-
Stock the shelves with your favorite bar essentials and enjoy!

Your Recently Viewed Projects
Thanks for your comment. Don't forget to share!
flowergirl
Nov 28, 2018
Even though this project is intermediate rated, it's actually not that hard to do and I love that it's used copper pipes. Copper has been my favourite material this year. The assembly should not be hard if you already have some power tools and an old storage cubby. You can take the party from the living room to the backyard with ease.
Report Inappropriate Comment
Are you sure you would like to report this comment? It will be flagged for our moderators to take action.
Thank you for taking the time to improve the content on our site.