DIY Mail Organizer

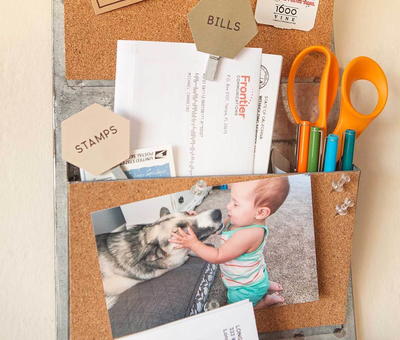
Create a marvelous mail station to hold bills, stamps, and other mailing essentials! This DIY mail organizer will keep all off your postage needs together so you never have to search for a stamp again. Adding corkboard to this organizer makes this piece perfect for decoration as you can pin notes, photos, and messages to your mail organizer. This DIY mail holder also creates labels so each member of the family can quickly grab their letters without constantly sorting through everyone's mail. Organize your postage needs today!
Time to CompleteUnder an hour

Project TypeMake a Project
Materials List
- Mail station
- Cork contact paper
- Cute clothespins
- Scrapbooking paper
- Scrapbooking adhesive
- Acrylic Centering Ruler (2" x 14")
- Cutting Mat (24" x 36")
- Hexagon Squeeze Punch (Extra Large)
- Easy Change Detail Knife
Instructions:
-
Basic mail stations are available at most department stores. Find one that matches your home decor and that has flat pockets. Use the Acrylic Centering Ruler to measure each pocket.
-
Use the Easy Change Detail Knife on the Self-healing Cutting Mat to trim the cork contact paper down to fit each mail station pocket. This knife is wonderful for cutting medium weight supplies and changing the blade is quick and simple.
-
Apply the cork contact paper to the mail station pockets. This allows you to now actually pin important things to the piece, making this mail station even more useful for quick notes and reminders.
-
To create the pocket divider that keeps the pens and scissors from falling down and getting lost, measure the side triangle of the mail station using the ruler. Then trace to create the divider flap and cut it out of scrapbooking paper using the detail knife on the cutting mat. Adhere it to the metal using scrapbooking adhesive.
-
Use the XL Hexagon Squeeze Punch to make tags for each element. Print out the names of family members and words such as “bills”, “stamps”, etc. Punch them out and then add to small clothespins using scrapbooking adhesive again. Clip labels onto each item that needs to be organized in your new family mail station.


Read NextQuick and Thrifty First Aid Box
Your Recently Viewed Projects
Thanks for your comment. Don't forget to share!
Report Inappropriate Comment
Are you sure you would like to report this comment? It will be flagged for our moderators to take action.
Thank you for taking the time to improve the content on our site.