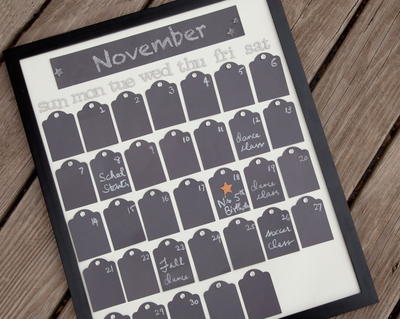
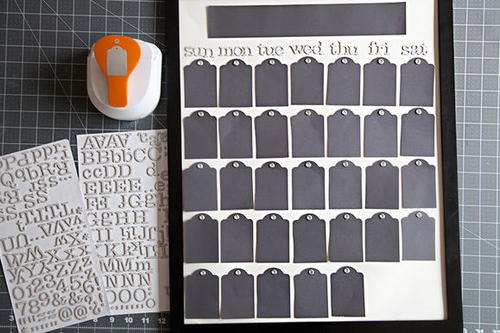
DIY Chalkboard Calendar

Create a simple and re-usable project with this DIY chalkboard calendar. Your schedule will never look more fun than when it's written on a chalkboard tag. These nifty tags acts as calendar days to keep your important activities organized. This chalkboard calendar DIY project is great in balancing the kids' schedules and ensuring you never miss a meeting, activity, or practice. Adding personal embellishments will make it easier to keep track of individual schedules and important dates. Make this easy chalkboard project today and keep your schedule fun and organized.
Estimated Cost$11-$20
Time to CompleteUnder an hour

Project TypeMake a Project
Materials List
- Chalkboard Paper
- Eyelets
- Adhesive
- Chalk
- 16” x 20” Picture Frames
- Alphabet stickers
- Standard Tag Maker with Built-in Eyelet Setter
- SureCut™ Deluxe Craft Paper Trimmer (12")
- Cutting Mat (18" x 24")
Instructions:
-
Using the Standard Tag maker, punch tag shapes from chalkboard paper. You will need about 35 to 40 tags.
-
Punch a hole on each tag and set an eyelet in the hole.
-
Arrange tags to form calendar the calendar rows, mounting them with adhesive onto your chosen background. For this calendar, we used a base that fit into a 16x20 inch frame.
-
Use letter stickers to add the days of the week at the top of each column.
-
Cut a strip of chalkboard paper and place it at the top of the calendar to write your month.
-
Punch some small stars as additional embellishments.


Read NextRustic Twig Monogram